Image SEO is about optimizing image type, dimensions, size and description for search engines and users. It is important to optimize images for on page SEO, technical SEO and user experience.
Optimizing images means improving the images on your site to generate traffic. To rank on the first page of Google you have to do more than just optimise your written content and that is where Image SEO comes into play. It helps you understand and improve your images so they can boost your site’s rankings instead of pulling them down.
Image Optimization can include:
If you follow the much too common practice of inserting stock or phone captured images directly into your web content, you may benefit from this image seo guide.
Keep reading to learn more about why image optimization is necessary for Search Engine Optimization [SEO] and User Experience (UX), and what image seo best practices you can follow to improve your site.
You might need to optimise your images to:
Website speed plays a key role in both user experience and technical SEO, and images can be the biggest issue when it comes to site speed. In fact, unoptimized images can contribute to 75% of a page’s weight.
Your site speed can impact SEO negatively if you have pages that take much too long to load. Google evaluates page load speeds as part of its Core Web Vitals check.
Fast page speed is a positive ranking factor for Google as it contributes to better browsing experience and SEO. Optimising large images for the web includes reducing their size and dimensions to prevent page bloat. You can use tools like Pingdom, to help you assess your site’s speed, and how your images are impacting it.

Images can lead to a positive user experience without question. If you visit a content-heavy web page that’s missing images, chances are you will quickly get overwhelmed with the amount of text you see and exit the site.
Whereas, if you arrive on a page that is well-balanced, includes structured content with relevant supporting images, you will definitely choose to spend more time scrolling that web page, reducing the site’s bounce rate.
This is especially important for ecommerce stores with lots of products. Just having a description for the products available for sale won’t make the cut for customers. To get conversions, you need to have images that clearly communicate what your products are.
With ecommerce sites, images not only improve the customer journey, but form a key trust signal for customers.
Adding optimised and related images to your content can also help from an accessibility perspective, as these images make it easier for differently abled users and screen readers to understand your web page, along with the use of alt tags.
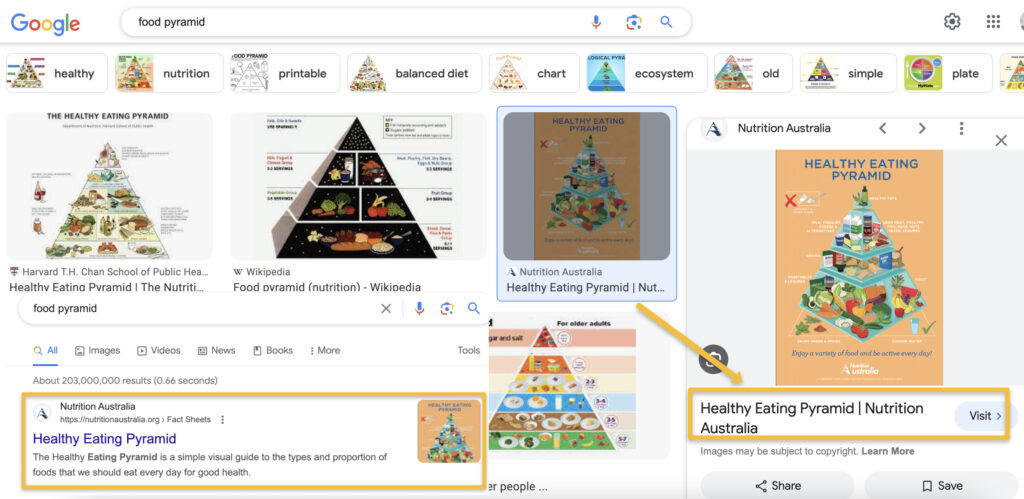
SEO wise, images can help you rank for Google Images, as well as Google Search Results.
Google uses the context provided for images to return searchers with the right search and image results. This means optimizing your images with the right title, alt tags and description will improve your chances of showing up for relevant image search, and give you another means of gaining organic traffic.
This way, if a user puts in a query that search engines deem fit for image results, your optimized images may end up in both search and image results.
As a whole, Google will evaluate your page’s quality through readable content and a user-friendly web page to rank you in the SERPs. This means placing the right images, with high quality content that is best suited to the user.
So how can you optimise images for both the search engine and a better user experience? The following image optimization tips may be a good place to start.
If you have your content in place, you need to pick the right images to go with it. This may be pretty straight forward for ecommerce businesses, but may need an extra thought for service pages and blog posts.
For these content heavy pages, having related images to your content can include a simple stock image, a diagram explaining a concept, or a screen grab that gives context to your content.
Images that are unrelated to your content can be a turn off for readers, especially those looking to get additional context out of those images.
It also helps to use images unique to your page. The downside of using standard stock images can often be the risk of appearing generic with images that are used by plenty other web pages.
Consider adding customised screenshots, branded infographics, charts, and tables to your content which will not only make it stand out more, but also offer your readers a good and easy read.
Don’t forget, Google ranks your page as a whole based on quality and user-friendliness, so only add images where they actually add value to your content to uplift your webpage.
Image format can make a difference to your site’s SEO and user experience. Image formats include:
JPEG and PNG images are the popular file formats for most images on the web and we recommend sticking to the same. Consider using JPGs for your blog post and product images to maintain your page speed, while leaving the PNGs or SVGs for your brand logo and other essential images requiring high quality.
Once you’ve agreed on the image file type, make sure to scale down your image and resize it to the maximum pixel width requirements of the website.
Usually, the image dimensions may vary depending on the Content Management System [CMS] you use. So when you’re resizing images, keep these requirements in mind, especially for Shopify and WordPress image sizes.
WordPress automatically creates default image display sizes when you upload an image, but that does not mean the image file size has also been optimized. When uploading images to the CMS, make sure to optimise them from your end to prevent page load speed issues later.
To resize your images manually, consider using tools like Photoshop, or GIMP. If you’re using wordpress, you can also make use of plugins to scale your images.
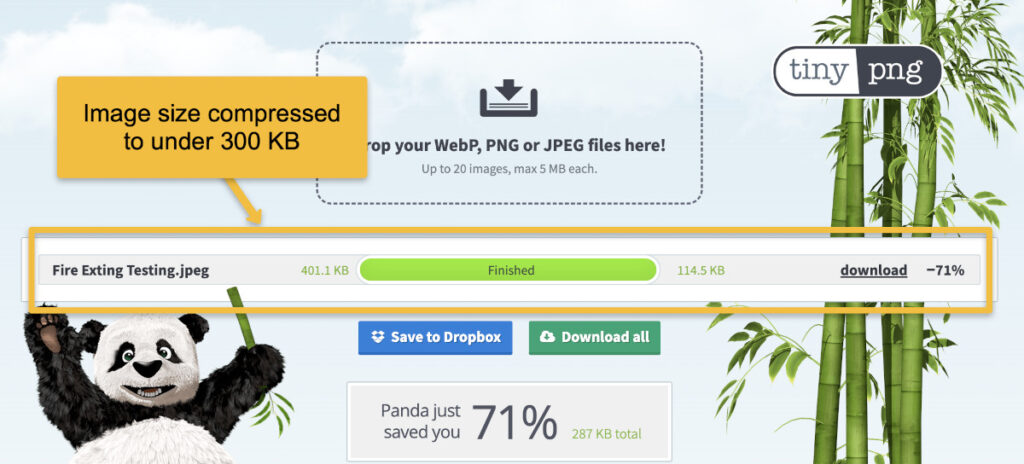
To give both users and search engines the best version of your website, make sure to compress your images before uploading them. An ideal image size would be one that is under 300 KB.
Image dimensions and image file size are two different things and both need to be optimised for optimum page speed and user experience. The larger the file size, the more it will add to a webpage’s size, and usually if an image is high in pixels, it will also have a large file size.
Google looks at the page size as a whole when evaluating your site, and having multiple large images on your webpage can poorly impact your core web vitals.
Consider using online tools like TinyPNG, or the WordPress Smush Plugin for image compression to an acceptable size without compromising too much on the image quality.
File names are possibly the most overlooked when it comes to image SEO. The default names for images often look like IMG_0693.jpg, which does not communicate the contents of the image clearly.
Although not a ranking factor, optimising file names is an essential part of Image SEO as keyword specific file names will help search engine crawlers to figure out what each image file in your media library is about.
For example, a good file name for a black leather office chair image would be black-leather-office-chair.jpeg. This file name provides context to Google about the image.
Also note here that Google suggests using ‘hyphens’ instead of ‘underscores’ for file naming.
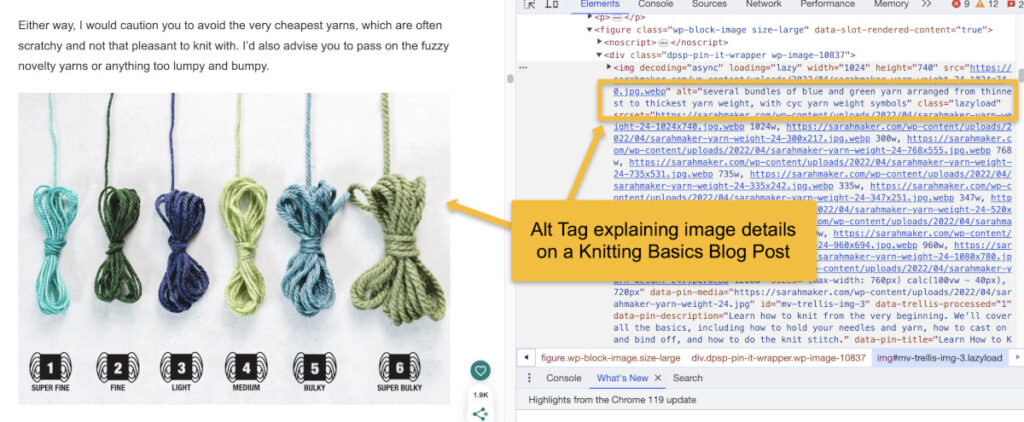
Alt attributes are a primary best practice for Image SEO. They are pieces of text used as an alternative to the image and come especially handy when the image fails to load.
In these cases, the alt text will be displayed in place of the image.
Google utilises the alt text to understand the image context and return it for the right search queries, while screen readers can use the alternative text to describe images to users. This makes alt tags important for both user experience and SEO.
The best alt tags will be descriptive and keyword based, to help both users and search engines. Consider the following example of good and bad alt tags:
As per alt text rules, keep your alt tags under 125 characters, as that is the maximum length read by Screen readers for alt text.
Structured data can be added to content and visuals across a website to make rich results possible on Google SERPs.
A rich result is one that is more detailed and may contain visuals and other content alongside page title and meta description. Think of a Google Search for ‘Chocolate Chip Cookie’ recipes. If a website has structured data makeup for recipes, you might see a relevant image, ratings and prep time for the recipe all in one search result.
When searching the web, you might be more likely to click on results that give you more details at a glance while also appearing visually appealing, and that is where image SEO plays a part.
To start working on structured data for your site, consider going through Google’s Structured Data guide.
Responsive images are images that have been optimized to adjust for the user’s choice of device. Creating responsive images is important for a mobile-friendly user experience. Since Google has a mobile-first approach to crawling and indexing, a poor mobile experience can pull your rankings down.
When creating a site for the mobile, make sure to optimise your images to ensure they are suitable for varying screen sizes and resolutions. This is done using the ‘srcset’ attribute which can return a different image for each screen width.
Cascading Style Sheets [CSS] can help to scale images automatically for different devices, giving a seamless website experience to users on mobile phones, tablets, and desktop computers alike.
Lazy loading is a great way to speed up your site for the user. It recognizes less critical components of a web page located further down on the page, and only loads them when they are needed [or as the user scrolls down].
This helps the page load fairly instantly when the user first arrives on it, while the rest of the page’s contents such as images and javascript load later. However, when using lazy loading, make sure to skip the webpage above the fold, as delayed loading on the first visible part of a web page can lead to a negative user experience.
When Google crawls your site, it should be able to find your images as well, especially if you want them to rank on Google Images. As per Google, an image sitemap helps it find images that otherwise could be overlooked, such as those with Javascript.
The best way to do this is to incorporate images into your sitemap, or create an image sitemap separate from your regular sitemap. The image sitemap includes URLs of all images on your website. If you create a separate image sitemap, it can also include images from other domains.
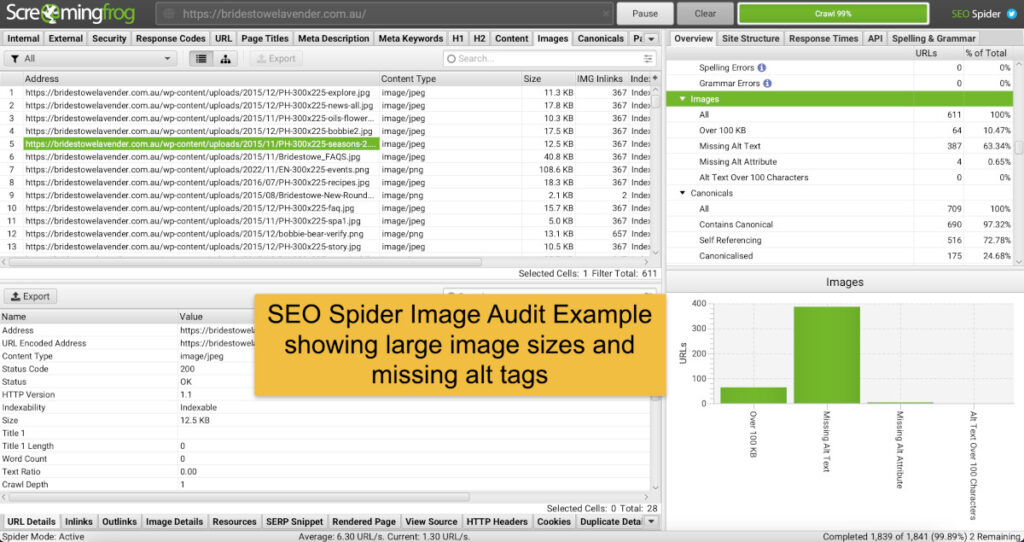
Just like you would audit a site to figure out other technical SEO issues, conducting an audit for existing images on your website can also be useful. While you work to upload optimised images on your site, there may be pre-existing images that are impacting your site’s performance.
Your aim with this audit should be to identify key image issues:
Additionally, you can also look for any broken image links. By taking care of these image seo issues, you can make sure your website is at its visual best, both for desktop and mobile users.
Consider using site crawl tools like Screaming Frog to conduct your image audit. It can help you spot large images, missing alt text, and even create an image inventory and sitemap.
Websites are all about visuals now and that means you need to be on top of your image optimisation to compete. With these image SEO tips, you could improve your on page SEO, off page SEO and UX, all at once.
Image SEO can be a hassle for many business owners, and if your focus is on hitting those sales numbers then consider hiring SEO experts to get the organic traffic and search engine rankings you need to get there.
Request your free marketing audit from us today: