

Scaling Facebook Ads For Ecommerce [Ultimate Guide]
Download Now.
Getting your WordPress image sizes right is super important for 2 reasons.
This must-read guide explains everything you need to know about WordPress image sizes.
Keep reading.
Image size matters when it comes to WordPress.
If you get the image sizes wrong you could end up with misplaced, blurry or slow-loading images that affect the speed of your website, overall WordPress web design & WordPress SEO.
Luckily, WordPress itself helps you avoid these problems.
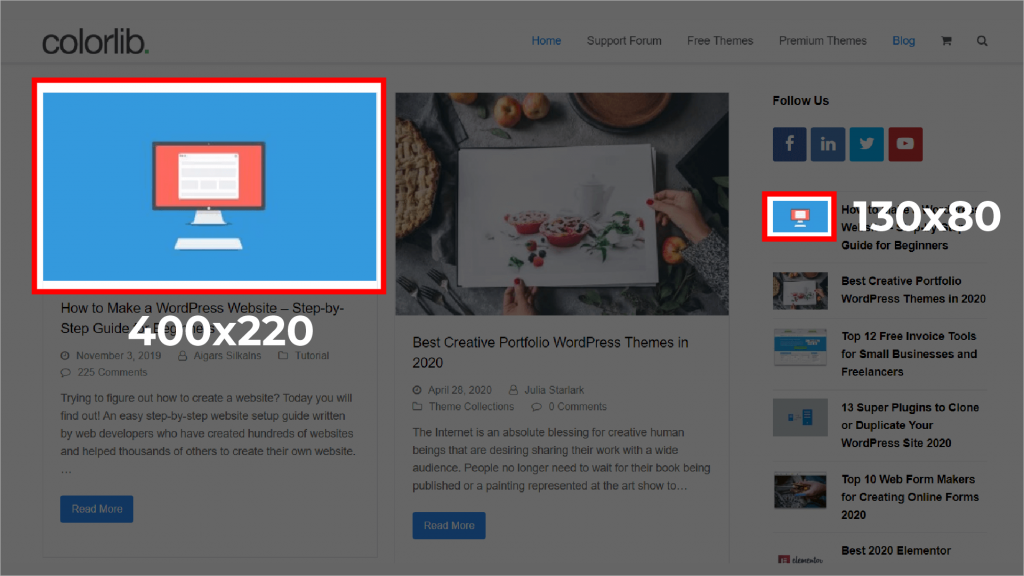
Whenever you upload an image, WordPress automatically creates 4 different image sizes:
WordPress does this, so you don’t have to keep resizing images manually and to ensure the best image size is selected for different locations on your website.
For example, the image size used in the header of a blog post will be different from the blog post’s thumbnail image.
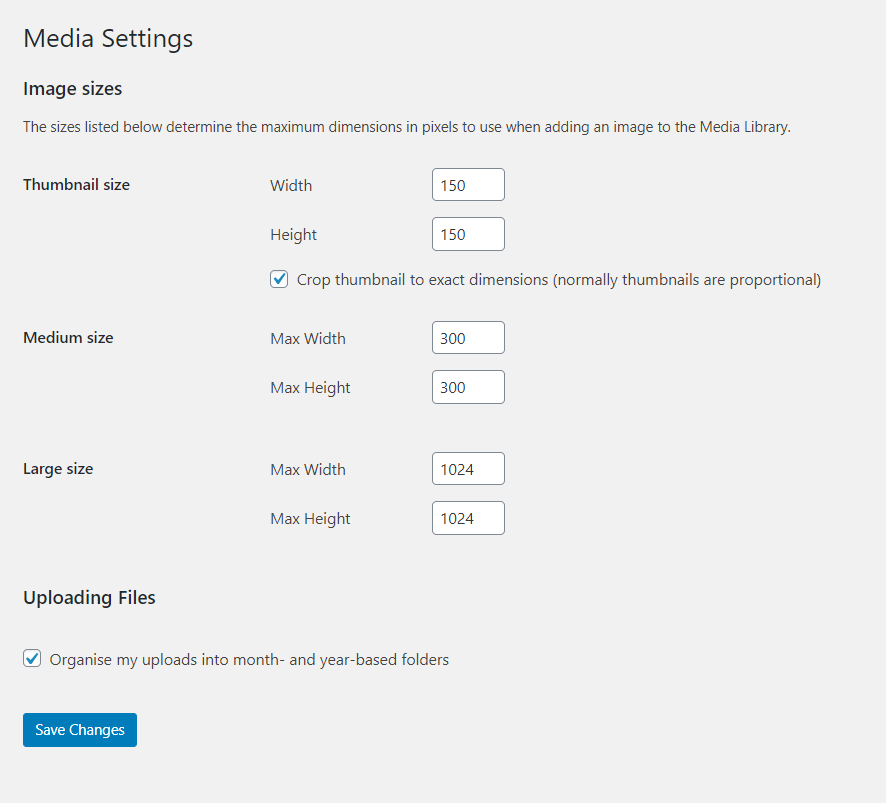
In addition to the default image sizes, you can also upload your custom image sizes to fit your needs.
Here’s how:
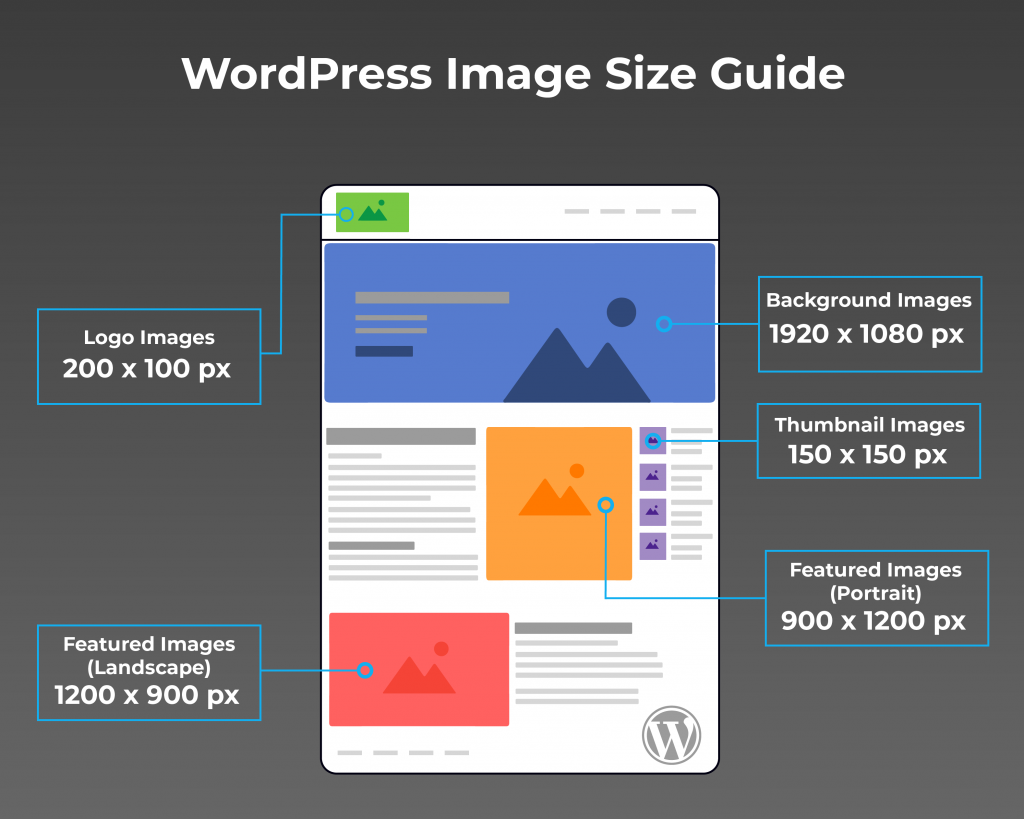
What’s the best image size to ensure fast, high-quality images that look good and responsive on desktop, tablet and any mobile device?
Here are the best image sizes for WordPress:
One of the most important aspects of uploading images to WordPress is to consider the size of each image file. Any image with a large file size will hurt the speed of your website, which ultimately affects user experience and can cause visitors to ‘bounce’ from your site.
There’s no point having images any bigger than they need to be.
As a general rule, WordPress image sizes should be no bigger than 150kb except for large photos.

Website speed is incredibly important when it comes to the success of your website.
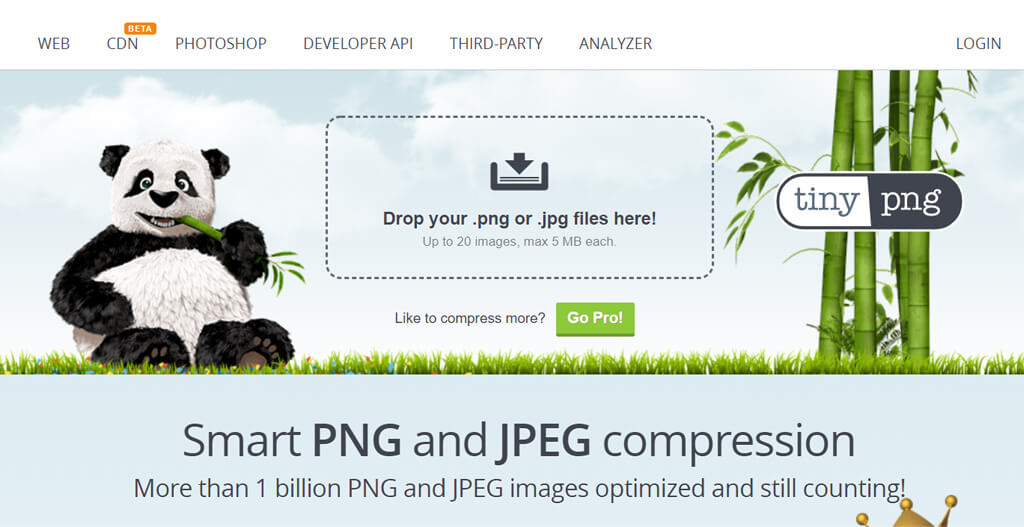
Compressing images before uploading to WordPress gives extra performance without sacrificing the quality of your images (it doesn’t resize images).
Every image you upload to your site should have image compression applied; otherwise, your negatively impacting your site’s performance.
Great online compression tool: tinypng.com, which compresses images within the current dimensions without losing image quality.
Bottom line…
Compress every JPEG (photo) and PNG (graphic) you upload to improve website performance.
Remember earlier in this post about how WordPress processes image?
Well by automatically generating different sized images, WordPress, by default offers responsive image compatibility that allows web browsers (Chrome, Firefox etc..) to select the best-sized image depending on the visitor’s device (mobile, desktop etc…).
So, if someone is using a mobile device to view your website, then the browser will show them a smaller image to speed up page load times.
Bulkresizephotos.com is a handy tool for resizing WordPress images. So, let’s say your original photo was 5000 pixels wide and you only need it to be 200 pixels wide. You can use this tool to adjust the size of your images quickly.
WordPress accepts many different image formats.
And each format has it’s advantages and disadvantages for file size/image quality ratio.
Pro tip: You want to choose an image format that offers a good balance for both speed and image quality.
As a basic rule of thumb, choose JPEG for photos and PNG for graphics.
JPEG
Joint photographic experts group or JPEG as it’s commonly known supports 16 million colours and is the smallest file size for photos. Using JPEG for your photo’s means the image will not only load faster, but it will also appear more vibrant.
PNG
Portable Network Graphic (PNG) supports fewer colours than JPEG but allows for image transparency and is becoming the default choice for website elements like graphics and logos.
GIF
Graphics Interchange Format (GIF) supports 256 colours, transparency and can be animated.


DPI determines the quality of an image.
The more dots or Pixels per inch an image has, the better the image resolution will be.
For example, a 300 DPI image will have a higher resolution than a 200 DPI image.
For uploading images to the web, 72 DPI is the accepted standard and there’s no need for you to set your images any higher as it will increase your file size.
The only time you would set a 300 DPI is for printing purposes.
WordPress has some fantastic plugins to help you optimise your images and make sure you find the right balance between website performance and image quality that appeals to your users.
Here are some of our favourite WordPress image plugins and their uses:
Staying organised and in control of your images will have a big impact on your sites performance and overall success.
Here are a few bonus tips to help you manage your WordPress images.
Did you know that your WordPress images can attract more visitors to your website with organic SEO?
By performing minor tweaks to each image you upload, you can give your images a great shot at showing at the top of google images.
Here’s how:
Title Tags
Title tags can give clues to search engines to help them understand what your image is about.
So instead of uploading img_45632.jpg update the tirle to something more accurate and descriptive -> small-grey-cat.jpg.

Alt Tags
‘Alt’ tags (alternative text) are used within HTML code to describe the image (a small yellow cat).
Alt tags tell search engines like Google what your images are about and if optimised correctly, can help your images show up at the top of Google and increase the traffic of your site.
High Quality Stock Photos
Stock photos are a fantastic tool when your short on time (or budget) and want some good quality images quickly. Don’t be afraid to add in some stock photos to make your posts stand out and keep readers engaged.
Getting WordPress image sizes right doesn’t have to be a complicated process.
Most of the time, the default image sizes WordPress gives is perfectly fine.
Now it’s your turn.
What’s your process for managing and optimising images on WordPress?
Let me know in the comments below!

Jonathan Gorham is the co-founder of Engine Scout and a passionate digital marketer, focusing on topics surrounding ecommerce marketing, SEO, and web design. He's based in Melbourne, Australia, and when he's not working, you'll find him relaxing with family or hanging out with friends. Connect with him on Twitter or LinkedIn.
Download Now.
112 Responses
Jonathon: Greetings from Locked-Down UK. Very useful guide. Thank you. I have been worrying about the images on my website for 2 years. I sell prints so the images are important (it is what I sell) but the size is also important for all the reasons you explain. I have over 600 images (of prints) of different physical sizes on my site. I am currently in repair mode whilst I redo all the images (I have stepped out of repair for 24 hours if you want to see the images and understand the scae of my problem – they are as they were – I have not changed any yet – except the Wright Flyer). Step 1 was to scan them all (what you can see were photos). Step 2 was to clean them up with Photoshop Elements 2020. Step 3 is what I am now embarking on – taking the large (clean) png’s to small, but attractive jpg’s for sale. Your simple explanation helps a lot – and is a lot easier to follow than a lot of the stuff out there. Thank you.
Hi Iain, I’m glad to hear you found the guide helpful. All the best with re-sizing your images!
Is it cheeky to ask a follow up which I have found no help on elsewhere (or can I pay for a solution)? The image (eg a car) on a print page can take much less than half the page space. The blank white surround (requiring zero resolution) adds to dimension but shows depth (and allowance for mounting and framing). If I crop the surround a buyer will not see the print in context. Is there a way to manage this “dead” space v WordPress size limitation?
It’s best to leave the white space and that way your customers see the print in context. You don’t want to sacrifice the customer shopping experience to save a few bytes in image size. The extra whitespace won’t pose a problem for image loading speeds. Hope that helps!
Thank you very much for being much more succinct in your guide and more helpful than any other expert on the web! Now, at last, I can get going!
Thanks so much. I actually understood what you’re saying and it is all explained beautifully. Love the infographic as well. I’m doing an SEO class and trying to optimize my images so this is very helpful. Thanks.
Hi Judy, glad to hear it helped you optimise your images and good luck with your training!
Hey Judy.
From where are you taking SEO class. Let me know. Want to learn about it deeply
This was a very clear and helpful post. Thank you!
No problem, glad it helped!
I have compressed images, aligned all sizes and yet when I upload images come through with different size? Have no idea what I am doing wrong can you plse help?
Hi Michelle, if you want images to be the exact same size make sure that the image height and width (measured in pixels) are exactly the same for all your images. If you right-click on your images in Chrome and inspect them you’ll be able to check this. Hope that helps!
This post is really helpful and I got my all answers about image size.
Great post
Thanks!
Im having the same issue Michelle mentioned. For example, I uploaded my logo @ 300×100, click insert media, but instead of inserting a 300×100 logo itll show as thumbnail @ 150×150 So I go to custom size and set at 300×100 and WP still resizes it and will make my logo some weird size that I don’t know where the size is coming from. Like 225×75. Am I missing something here?
Hi Katie, this sounds like an issue with the WordPress theme you’re using. I recommend contacting the theme developer support team directly and asking them to help you with this.
Great article! Quick question though: Does the total number of images in your media library affect website speed if only say a third of the images are actually being used on the website. For example I may have 100 images in the media library but only 30 on the website. Thank you.
Thanks! You can add as many images to your media library as you want, it won’t impact website speed. What matters is how many images are loaded on each of your webpages. So the more images you have loaded onto a page, the more it will slow that page down. As long as you try to keep images under 300 kb in size you should be fine 🙂
Dear Jonathan: I find very helpful your post. However I have a problem with images showing graphs. The original graph looks quite good, even though it has a low resolution (72) and it is small in size. However, when I upload the graph in WordPress it loses resolution. If I try to increase the size within wordpress it is no readable. How can I manage graphs??
Superb information explained in an easy to understand fashion. Thank you!
Thanks Cliff 🙂
Do you have a recommendation on image sizes? I am talking about kb. Here’s what I currently do. I am using Generate Press and I use a 1024×536 for the featured image. I use Canva to create custom images. Then I use reduceimages.com to get the image to about 100kb before uploading it to WP. Recently I have been running PageSpeed Insight and under “Opportunities” it shows images, which are my featured images. Featured images are the only images on my pages. I try reducing the quality and get the images even lower quality, and PSI still shows the images as an “opportunity”. It seems like it’s perpetual resizing!
Hi Steve, if your images are at 100kb that’s good. Anything above 300kb is when I would look at optimising. If page speed is a concern for you then you may want to look at other factors like code bloat (additional CSS and Javascript) running on the page. There are also some solid plug-ins like WP rocket that can help.
This really helped! I’ve read so many articles that don’t have the visuals to back it up. Thanks so much this makes perfect sense now.
Glad you found it helpful Kaylini 🙂
Great work to help others. I find this article very helpful so many thanks.
Thanks Nazia
Hi. This is very clear and helpful. Two questions – in setting up a Photoshop file for say the Blog Post size of 1200×630 pixels.. what is the ideal resolution in pixels/inch? And which color mode is best? CMYK vs RGB in 8, 16 or 32 bit? Thank you so much. { I am working on creating a new web site from an old one in word press in addition to existing word press sites that are under development now.}
hi thanks for this article. im trying to upload header logo image on the left side of my wp website but i dont know the accurate size to use, the size i used is too smal can i use wordpress to resize or i have to resize before uploading and what size will fit header image logo. my theme is adforest.
Thanks, for this information. I am going to update all my images according to your information.
Thanks a millions for this valuable knowledge. I’m a WordPress learner it’s a very helpful guide for coders.
Well-explained.
I am still confused about deciding the size of an image.
You have mentioned the appropriate size. but I don’t think will be okay for my size. You can have a look here https://www.simplifiedblogs.com/
Can you please help how to identify the appropriate size of an image as well elements so that I can fix my issue?
I’m having a CLS issue in page insight and it’s affecting me a lot. Little help will be appreciated. Thanks
What is the best size of images to be used in blogger CMS in between the posts?
And I’m also facing problem when I’m converting those images to wepb which is the new gen image format but when I’m uploading them to the blogger they are again showing in jpeg why?
you are simple man
you help the most common problem
thanks bro
From : Indonesia
Glad you found it helpful 🙂
Thanks for this guide on images on WordPress.
Would like to ask a question.
What is the best option to leave our images in?
Thumbnail, Medium, Large, Full Size???
WordPress truncated the top and bottom of my image when I uploaded it. Do I need to go back to Gimp and shrink it or will choosing a different theme and reloading solve the problem?
Probably be useful to talk a bit about webp – next generation images and how to create & serve them. They seem all the rage from Google’s perspective particularly for mobile devices.
Any insights? Cheers
Thank YOu!
after i reduced images size from 300 dpi to 72 and using tinypng i reduced the size of the main page from 8MB to 1.5 MB and the website is loading faster now, from 4-5s to 1s
and also i’m using siteground optimizer, i used an option to convert images from png to webp
That’s so great to hear John! Awesome job speeding up your website and glad my tips helped you.
Hi Jonathan,
First and foremost, great article.
However, I am having issues with my images. I am using OnePress theme and in the Team section I am trying to upload images of my team. I tried uploading them in different sizes, then all of them to exact size, however noting is working. My images are cutting pix and not fitting into the template. I read and watched quite a few articles and videos and am still having same issues.
I need some help to fix my problem of showing images as they show up on my desktop.
Regards,
BG
Sir ، I have uploaded my pics after compressing them from 20 to 200 kb .. but the smush plugins state that 229 images need to be smushed .. but I have no option to smush them bcoz it tells me to go smush pro which I do not afford ..
That was pretty easy to read and was a lot helpful.
Thank you so much. 🙂
You’re welcome Tamzid. Glad to hear you found it helpful!
This article is perfect for the beginner or even more advanced worpress blog user. Question: does wordpress optimise uploaded images or do you need a plugin as mentioned in the article?
Thanks For sharing This Image Optimization info with us Which Tell us How use best Size images for speedy website
Thank you very much. Perfect article.
Hi,
That was really nice post, I learned a lot about optimizing images for WordPress website from this post.
Thanks For Sharing.
Informative blog post
do webp image format gives any advantage in SEO?
Thanks Preeti! The best advantage you can get from image SEO would be to make sure your images are small in size. Try to keep them all below 300kb if you can.
thanks for the tip 🙂
That was pretty easy to read and was a lot helpful.
Thanks Randy!
Thank you very much. It’s wonderful.
Google doesn’t show most of my blogs feature images on Google preview. I was wondering why? Probably my landscape feature image sizes are smaller than what you explained here.
Thank you very much.
Thanks for sharing of the information.
Glad you liked it Alex!
This is a very clear and helpful post. I’ve resolved my issue. Thank you!
Thanks Ramadan and glad to hear it helped you!
Thank you so much, I will start implementing this on my blog post
More then helpfull from others . A proper guideline helps me a lot. thanks for sharing…..
Fantastic
I find this article very helpful so many thanks.
You are awesome for sharing all that knowledge. I really appreciate visiting your website again. Thank you for your generosity!
Really helpful
I feel that you get different shape depending on size of the picture so, the original dimensions matter too.
Great tips – I appreciate the through guide. I’ll be referring my clients to this.
great tips- thaks to sharing a great tips
I really like the stuff mentioned and it is just to the mark. easy to understand and helpful. Thanks for the post.
Thanks for this awesome content. It should be enough for me right now.
Thanks
Hi Jonathon, Great article. I have a site I’m building in WordPress and uploaded a background image at 1920×1080, 72 dpi and everything “except the background image” in the site adjusts properly “responsive-wise” when down-sizing a browser window on my desktop monitor or viewing the site in different formats via mobile, tablet etc. I’m trying to figure out why it’s not working. Any thoughts?
Hi Lori it’s hard to say for sure without seeing the issue, but it sounds like a web design issue more than an image. You may want to look at hiring a WordPress web designer to help you troubleshoot the issue.
Great article. I have just one question.
Lately I discovered problems with my featured images in a post. And I wonder which above mentioned plugin this problem solves.
When I upload an image to put in a post as a featured image, WordPress automatically makes 8 size versions:
100×50
150X150
1536X864
1920X1080
256X180
300X169
768X432
940X446
After uploading I add it as a featured image to my WordPress post and WordPress automatically makes a 9th version: 450×222 pixels. And this version is used in my post. But it is displayed in a 770×380 size.
The result is a very fuzzy image, because the image is displayed bigger that it is.
How can I change that?
Hi Marcel, it sounds like it could be an issue with the original image you upload. Can you check what the original image resolution is? It should be 72 PPI which is the standard resolution for web images.
for the general reader – with retinal screens getting better and better, it is recommended to use 144dpi as a minimum.
– This has had me flummoxed for a long time, but I now have a “set” formula for size x 144dpi and for the odd situations where the image is tiny (eg: 25px x 25px) I use the exact size needed with 300dpi to stop the blur.
(Always go back to the original master file to do this – you cannot upsize the dpi of an image unless you reduce the dimensions- the number of pixels in the image stays the same.)
Love to read it, Waiting For More new Update and I Already Read your Recent Post its Great Thanks.
Nice job–very helpful. Thanks.
However, you do completely misunderstand DPI. That setting is meaningless in a web browser setting. The only number that matters is pixel count. A 1200 x 900 image with a 300 dpi setting is identical to a 1200 x 900 image set at 72 dpi. There is zero change.
Hey Don,
Appreciate the nuance you bring up between PPI & DPI but often, many image resizing tools use DPI and reducing DPI to 72 vs 300 will reduce the file size of your images. I understand it’s a term referring to digital print and you’re right I should make mention that I’m actually referring to Pixels Per Inch (PPI)
small-grey-cat.jpg.must you use hyphens in the photo name or is small grey cat.jpg ok
Nice article. What about slider size? Seems my slider media is off. I uploaded the ones I wanted to use at 700x 700 ( only because I thought it was a medium-ish size). Thanks
One of the most popular and highly rated plugins is “Regenerate Thumbnails.” This plugin allows you to regenerate all thumbnails for your images after you’ve made changes to the thumbnail dimensions, ensuring that all of your images are displayed correctly. Another useful plugin for custom image sizes is “Simple Image Sizes.” This plugin allows you to create custom image sizes based on your specific needs, and it also provides options for resizing existing images.
I’m having a problem with the title tag- I have downloaded the images I am wanting to use, re-titled them on my computer then uploaded to my SiteGround WordPress/woocommerce but it still has a bunch of numbers after it before the .jpg. Will this affect the SEO of my site? How can I fix it?
I’m in the process of switching from my old web builder to this one and I don’t want to continue too much further If I have to go back and rectify each photo all over again.
I have entered the alt text and title but the actual image title doesn’t change
Hi Claire, don’t worry too much about having numbers in your title. It won’t impact your SEO and is not a very strong signal. Even alt tags are not a big ranking factor. If you look at some of the images on my website you’ll find I have numbers too. It’s not something to worry about.
Hi Jonathan,
Just wanted to shout out thanks for this article. It is clear, concise and has excellent infographics. Much appreciated.
Thanks Michael.
so wished i had found this article months ago.. THANK YOU its has all the answers to all my questions Brilliant
Thanks Samantha
This is a great guide! I’m glad I found it.
Exceptional WordPress support! Your expertise and guidance have been invaluable in resolving my website challenges. Thank you for your outstanding assistance.
Excellent post it is very helpful and to the point great work
Thanks Aamir, glad you found it helpful.
This was very informative, but you lost some credibility by introducing dpi, equating it to ppi. DPI is the dots per inch laid down by a print head. It is a printing term. A digital image has a resolution of some number of pixels per inch which might be printed by a printer with print heads that can spray ink at 720 dots per inch. If your image is 36ppi, and printed by a print head printing 720dpi, then the printer will use 20 dots for each pixel from the file. The result will be a rather chunky image.
Hi Gregg, DPI is a common reference for digital images too when talking about image resolution. 72 DPI works well for WordPress Images and all images you don’t plan on printing as the image quality will look good on screen without creating larger than needed image files. If you wanted to print these images then yes I agree with you that 72 DPI can cause the image to be blurry when printed. For printing you would want to make the image at least 300 DPI but this article is only focused on optimising WordPress Images.
Hi Jonathan, How do I link FEATURED image caption with a website.
Jonathan,
Thank you for this explanation.
One thing I must have missed:
If the WP sizes are all square, how come the sizes you recommend aren’t?
How do I set a rectangular size and not a square one for the featured image in my posts?
Thank you,
Vera
Great Article <3 very very helpful.
I think there is a major issue in this topic images and wordpress.
WP creates different copies of the uploaded foto in different aspect ratios.
The files have then names like myfoto-800×600.jpg and myfoto-150×150.jpg for example.
Issue: The files WP created are still (for my taste) to big @kb.
What I want: Uploading my own fotos in the aspect ratio and compression I prefer.
If I stop WP from creating another aspect ratios of my image, then I have to rename them in a proper SEO way by myself.
Solution I thought: do it like WP and just add the aspect ratio to each of them = myfoto-800×600.jpg
When I do this, WP just adds to every single on of them a -1 = myfoto-800×600-1.jpg (no, the foto is not a 2nd time on the ftp). WHY?
Hi
01- I usually upload all square images except for the occasional specific size and have serious image intensive site plus now a storage problem because of the unnecessary image size generation bloat.
your blog does not cover setting Height only (or width as necessary) in the Media and woo image settings?
eg: set the media as: WxH
0X150
0X768
0X1024
(proportionally resized to fit inside dimensions)
and do the same in woocommerce.
so that I know I have control of height in layout (in my case).
? – any reasons to Not do this?
Also how to stop the auto generation of :
1536×1536: 1536×1536 pixels (proportionally resized to fit inside dimensions)
2048×2048: 2048×2048 pixels (proportionally resized to fit inside dimensions)
thanks
Super informative, thanks!
Very helpful post and straight to the point, great work!
Hi
Good Job!
Information is very good, especially for me, i had before rough sizes, now i will go on to follow your way.
Well done, mate, and thanks! And by way of proving it, I signed up for your monthly-tips newsletter (whilst hoping it’s *not* one I end up unsubscribing due to being endless spam).
I faced a problem with my featured image when it showed on the shop page that the upper head of the image was cut.
Great article thanks for sharing it with us. I have often wondered why there is a max image size and now I understand.
i read your article its very helpful
i face these kind of problems
Thanks for sharing these WordPress thumbnail size tips. I’ve found a couple other things helpful too. For compressing images, I use squoosh.app – it’s great for reducing file sizes without sacrificing too much quality.
Also, I add ‘add_filter( ‘big_image_size_threshold’, ‘__return_false’ );’ to my functions.php to disable WordPress’s automatic scaling of large images.
This gives more control over image sizes and can help preserve quality for larger images.
Very good tips. Thank you 🙂
hy, Nice information about images …for the use of article ..and Blogs
Great Guide thank you for sharing it for free it is gold worth!
Hi Jonathan, Nice article – very helpful & well explained. 2 questions:
You mention about changing WordPress default image sizes in settings – can you elaborate if you recommend altering them to better support the image sizes you recommend?
You mention about image SEO, do you have any opinions on what impact if any editing the ITPC information each picture has on SEO?
Actually what about the wordpress blog featured image size and cover phot size, i use 1200×700 px for default
Great article! Will definetly help me in my daily work. Thank you.
Thank u so much for this. I’ve tried using tinypng to compress my photos but only managed to reduce at best to about 600+kB. What could be the reason?
How can I further reduce images to 150kb?
Thank you!